Category: Jailbreak Guide

How to Jailbreak iOS 16. X on iPhone or iPad Using Dopamine

IOS developer Lars Fröder (@opa334dev) has officially released Dopamine v2. This permanently signable, semi-untethered jailbreak tool works on A9-A16 and M1-M2 devices running iOS & iPadOS 15.0-16.6.1*. Follow the steps in this article to install Dopamine v2 on a compatible device.

The Introduction of Dopamine v2

With TrollStore, Dopamine v2 can be perma-signed, so you will not have to sign it every seven days as you would with jailbreaks installed through AltStore or Sideloadly. Despite the fact that semi-untethered jailbreaks require re-jailbreaking after every reboot, perma-signing involves no interaction with a computer after installation.

Dopamine is a rootless jailbreak, so you can only use rootless-compatible packages with it. Several developers have already made packages rootless-compatible or are working on them now.

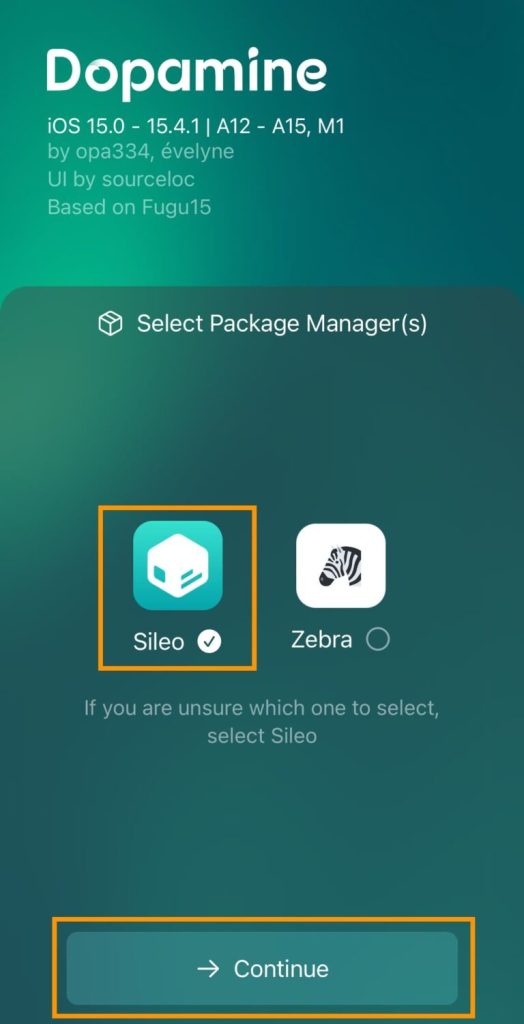
Finally, Dopamine installs Sileo or Zebra as the default package manager. During installation, you will get to pick which one you wish to use.

Compatible Devices with iOS 16

  • iOS & iPadOS 15.0-16.6.1 on A9-A11 devices
  • iOS & iPadOS 15.0-16.5.1 on A12-A14 and M1 devices
  • iOS & iPadOS 15.0-16.5 on A15-A16 and M2 devices

Steps to Jailbreak iOS 16* with Dopamine

Step 1:

Install TrollStore. TrollStore installation tutorial:

How to install TrollStore with TrollHelperOTA 

Step 2:

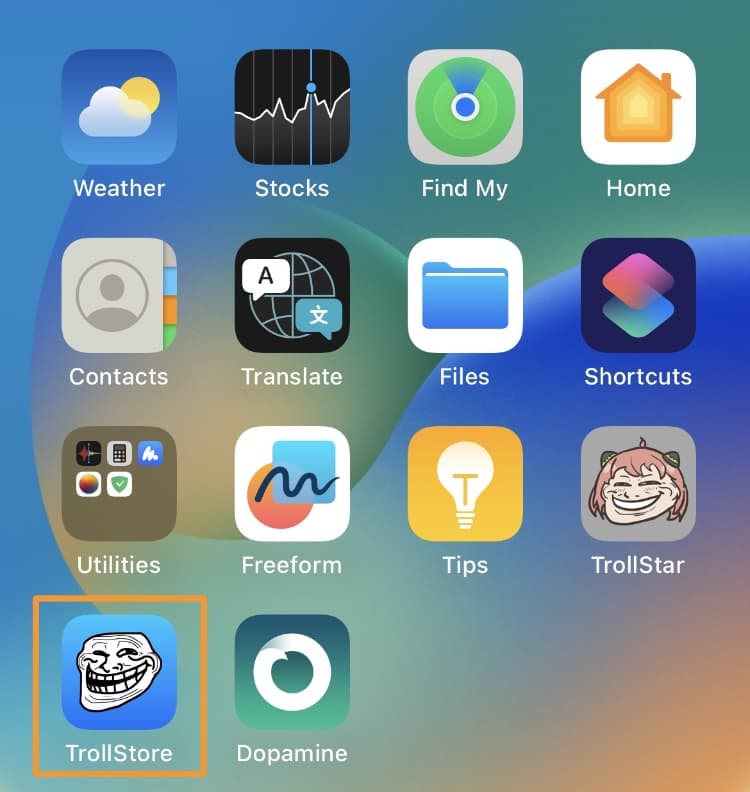
From your Home Screen, launch the TrollStore app:

Step 3:

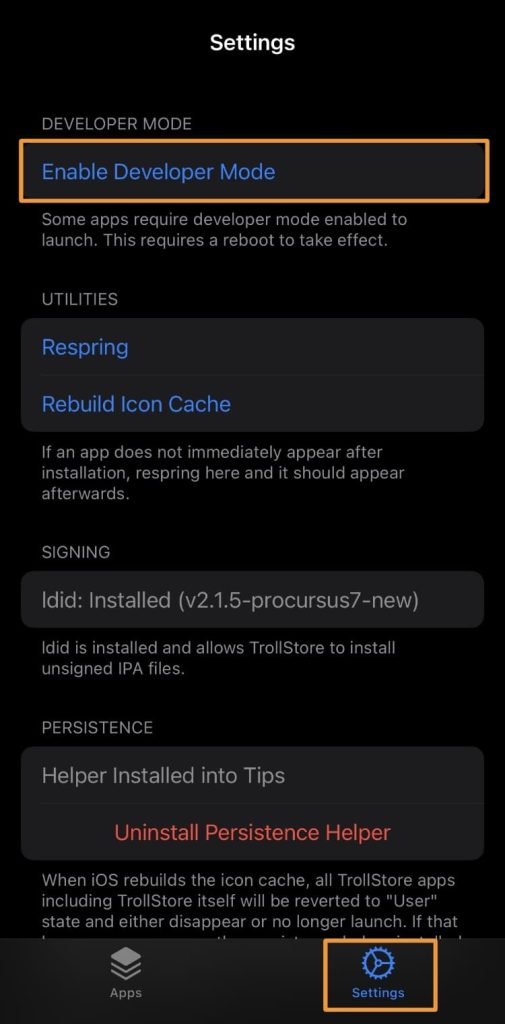
Tap on Settings:

Step 4:

Tap on Enable Developer Mode.

Step 5:

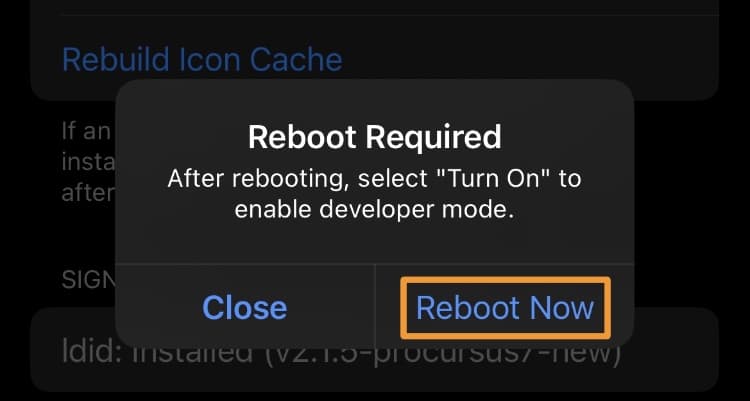
Tap the Reboot Now button on the pop-up prompt:

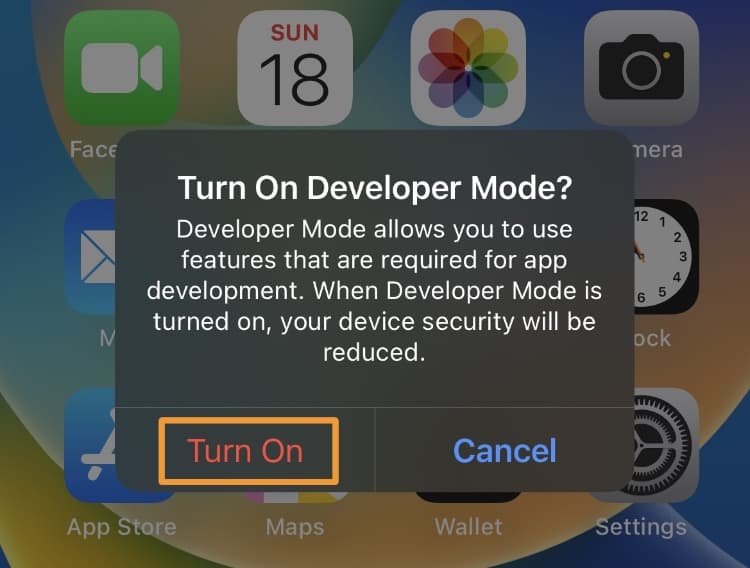
Note: Your device will reboot, and you’ll see the following prompt on the screen:

Step 6:

Then, tap the red Turn On button.

Step 7:

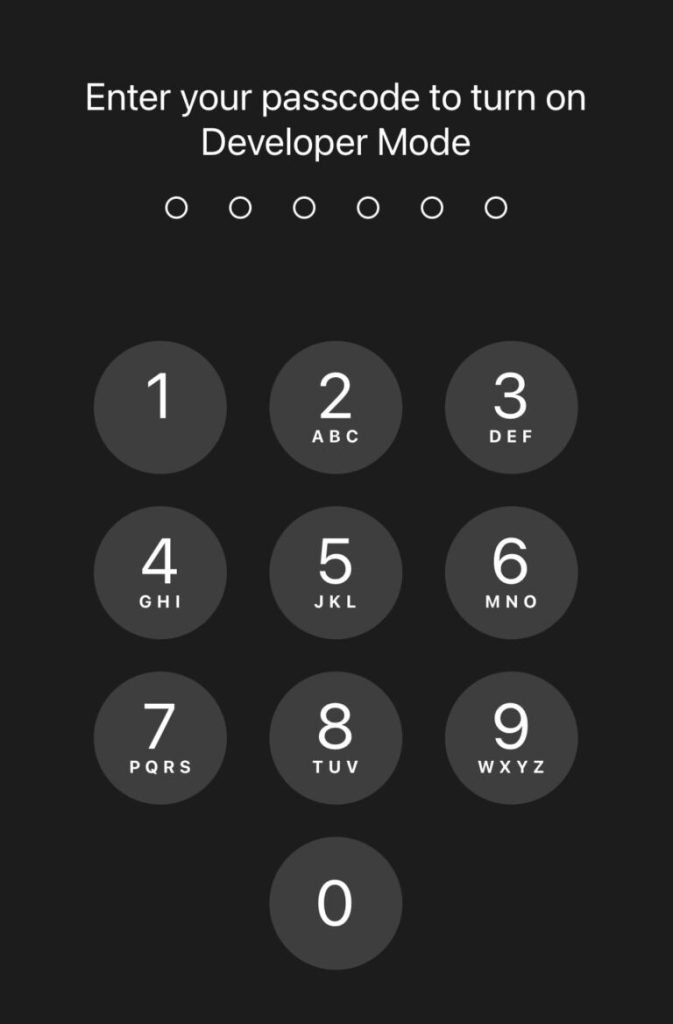
Please enter your passcode:

Note: Following the steps below, you can install and use the Dopamine v2 jailbreak.

Step 8:

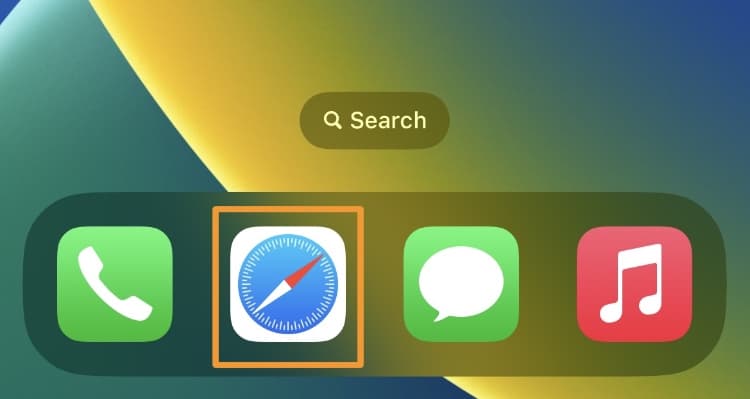
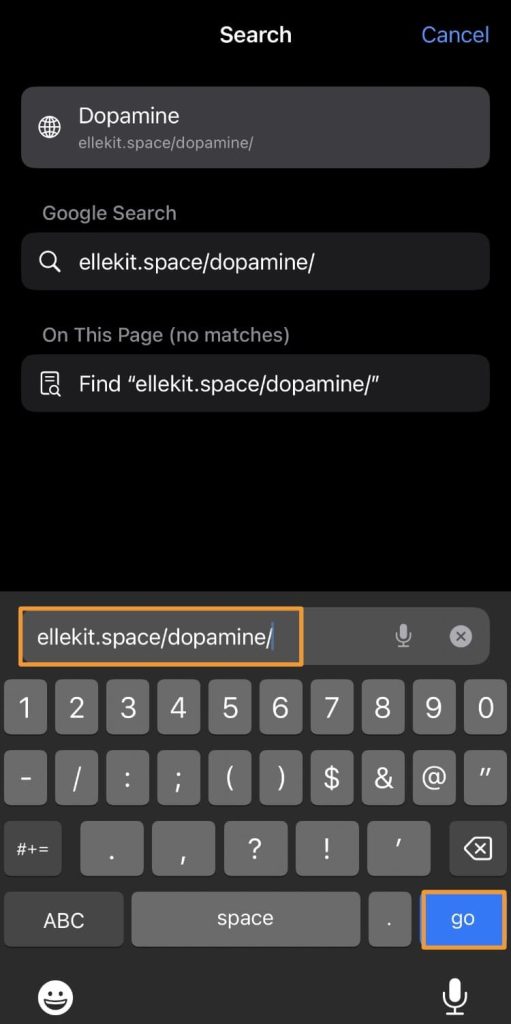
From the Home Screen, launch Safari:

Step 9:

Enter the following URL and tap the go key: https://ellekit.space/dopamine/

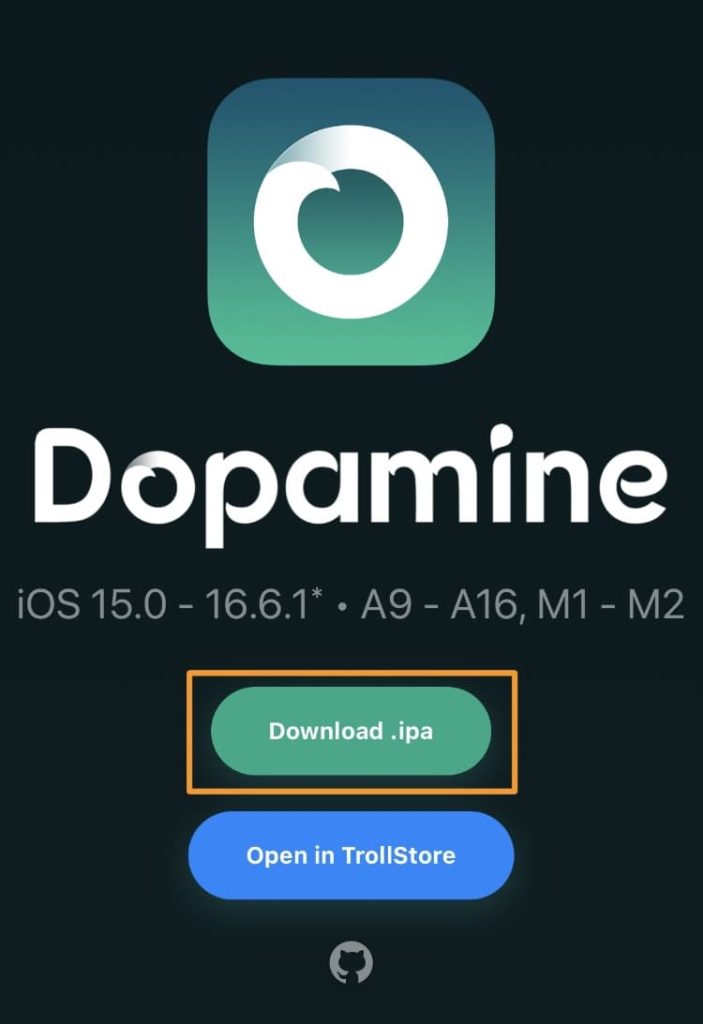
Step 10:

Tap the Download .ipa button:

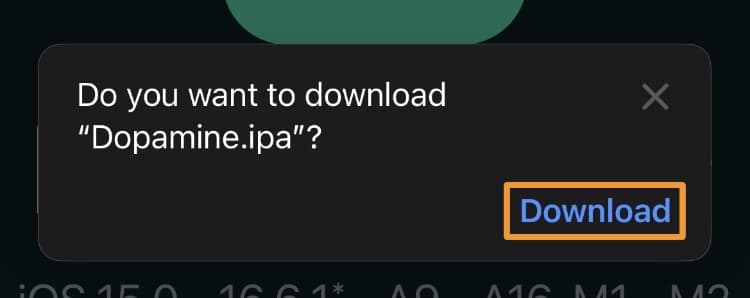
Step 11:

Tap on the Download button:

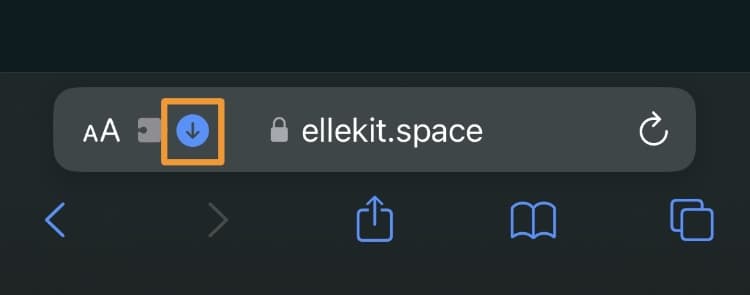
Step 12:

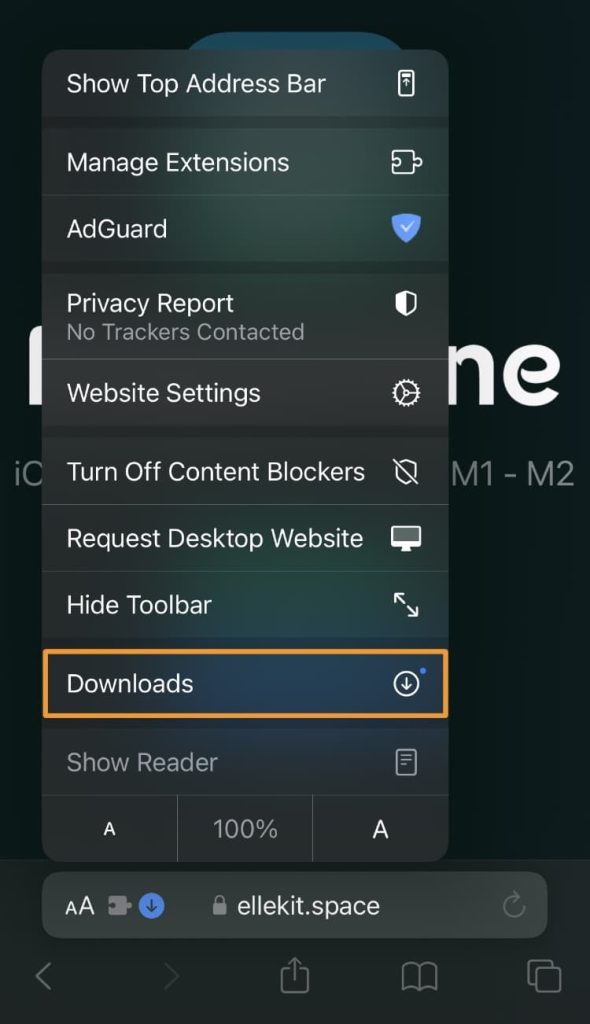
In the URL bar, tap on the Downloads glyph:

Step 13:

In the drop-down list, select Downloads:

Step 14:

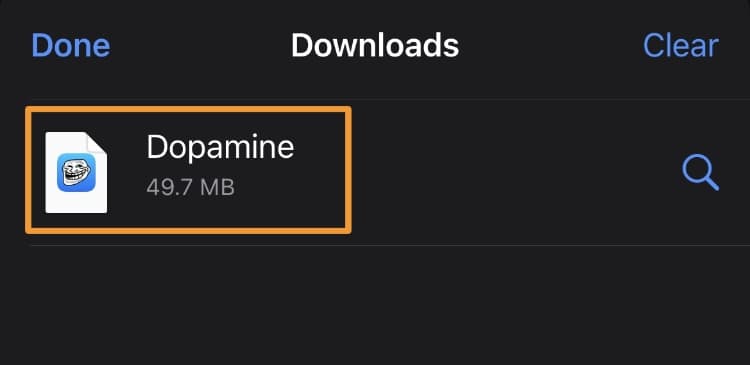
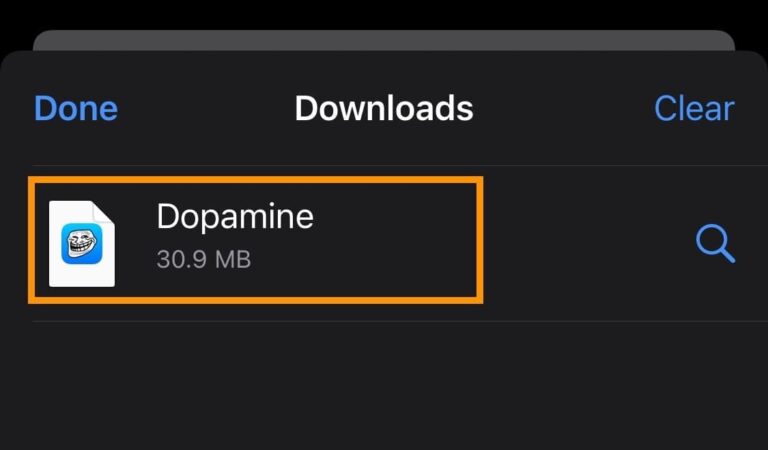
Tap on Dopamine from your download list:

Step 15:

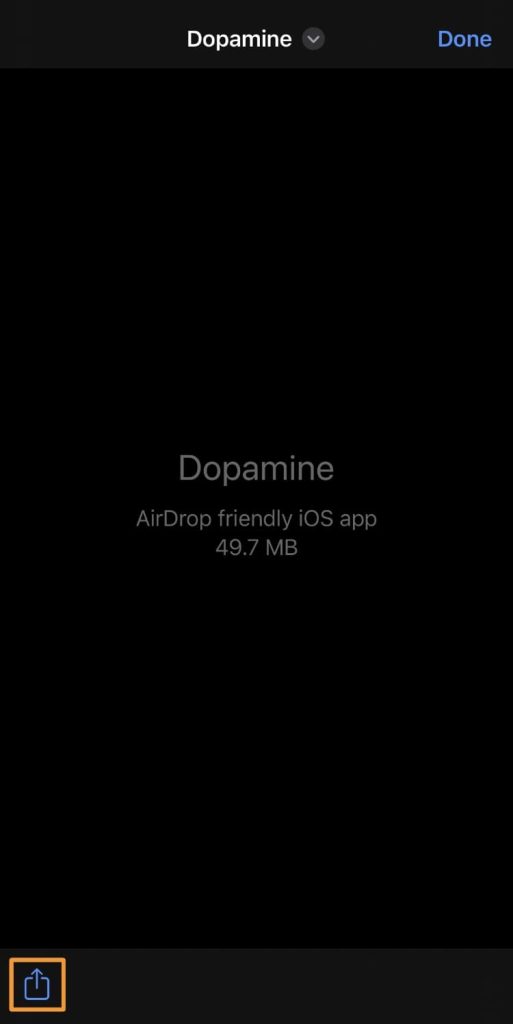
Tap the Share button in the next interface:

Step 16:

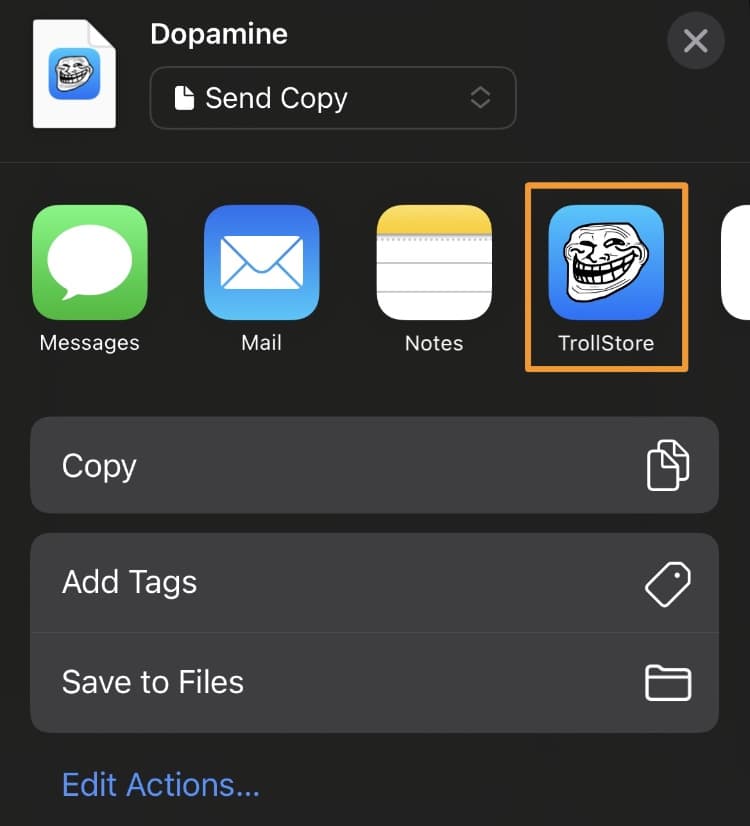
In the share sheet, tap the TrollStore icon:

Step 17:

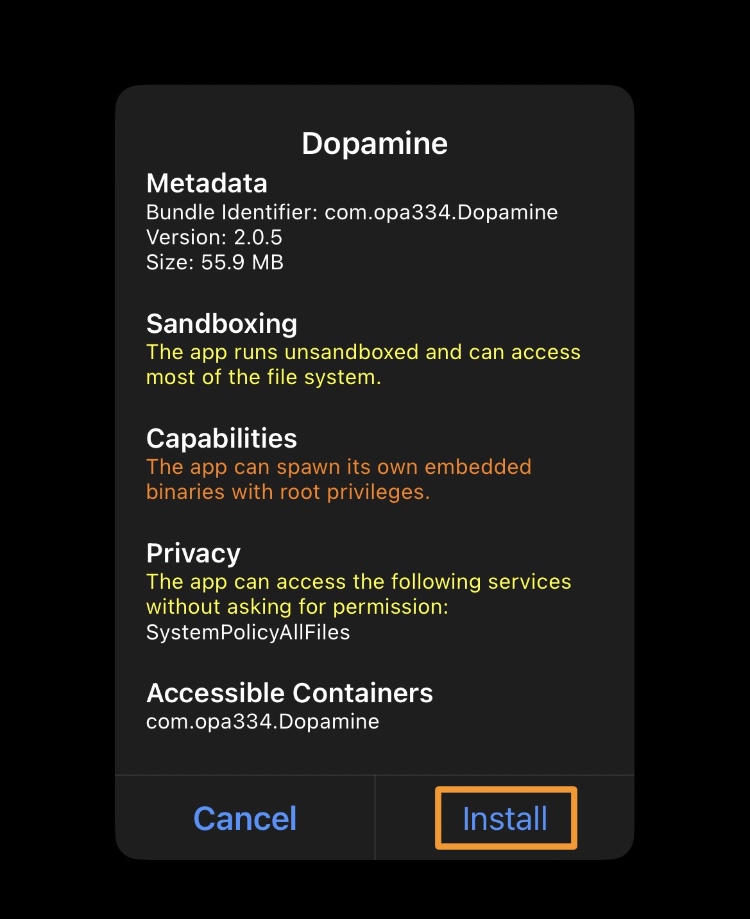
Tap the Install button:

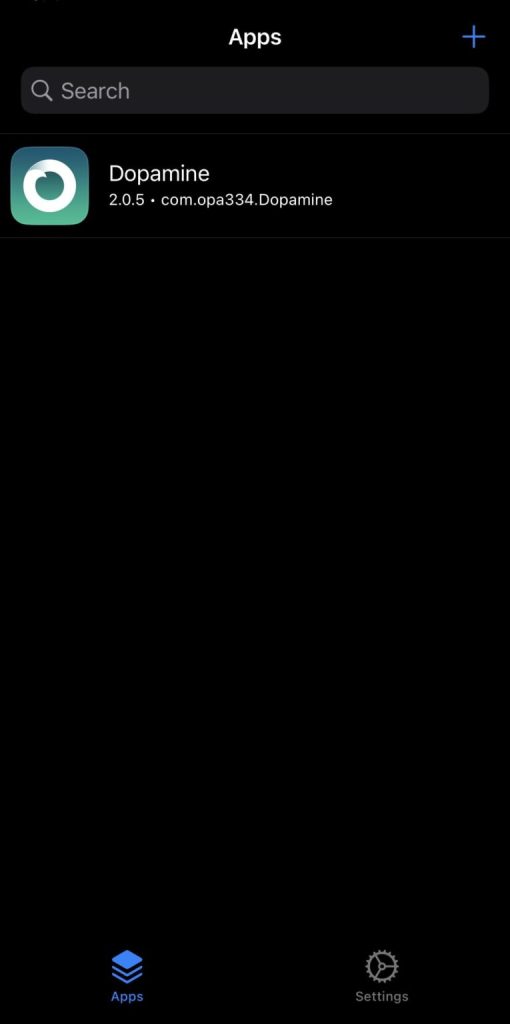
Note: After a few seconds, the app should appear in your TrollStore apps list as follows:

Step 18:

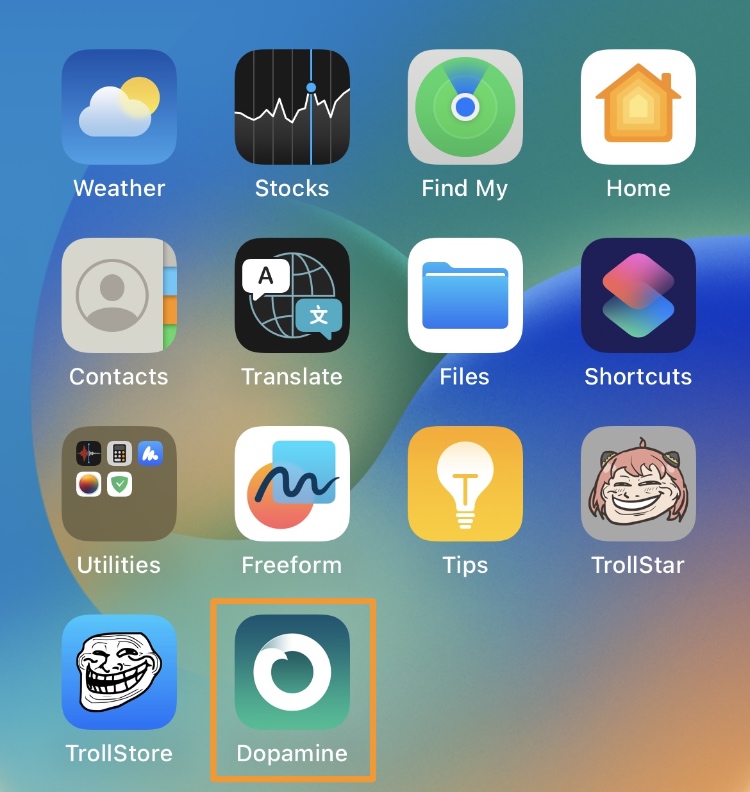
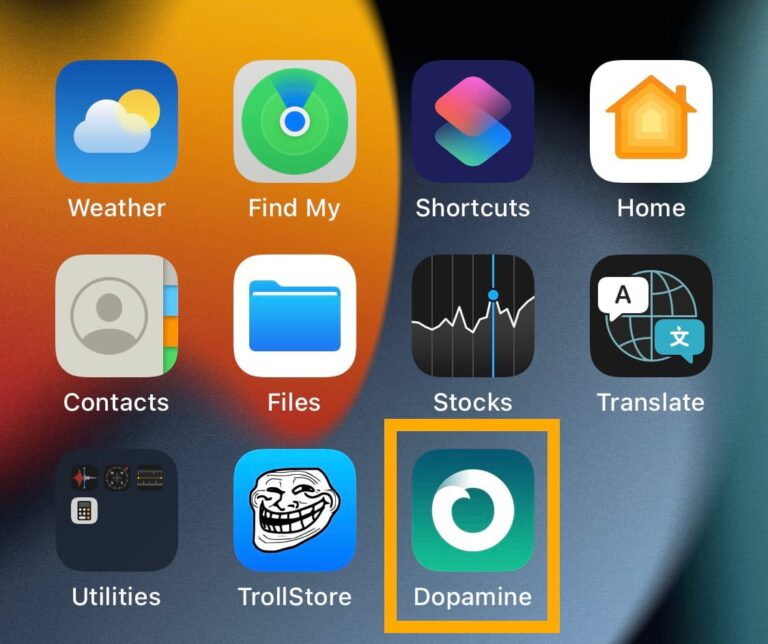
Once the Dopamine app is installed, open it from the Home Screen:

Step 19:

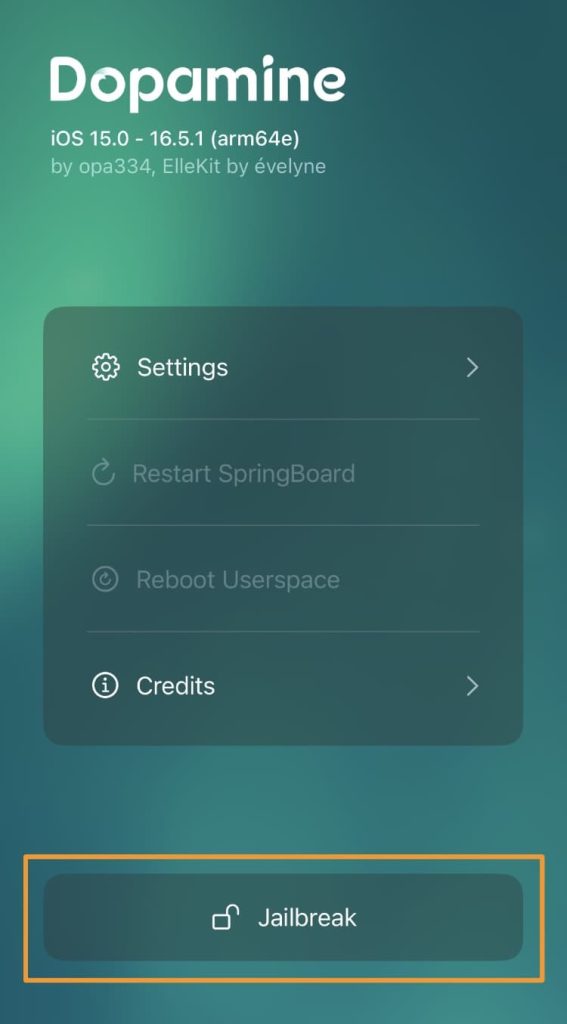
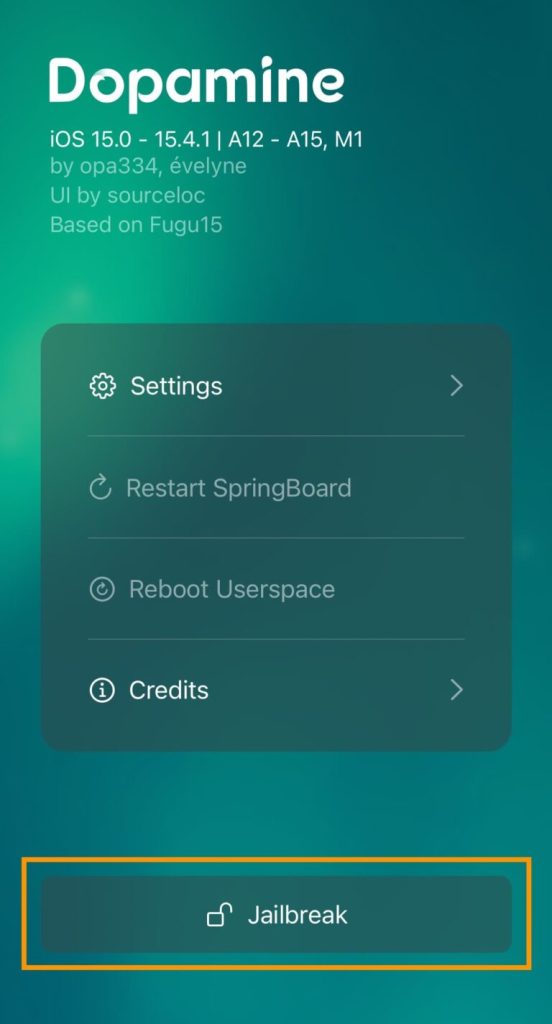
Tap the Jailbreak button:

Step 20:

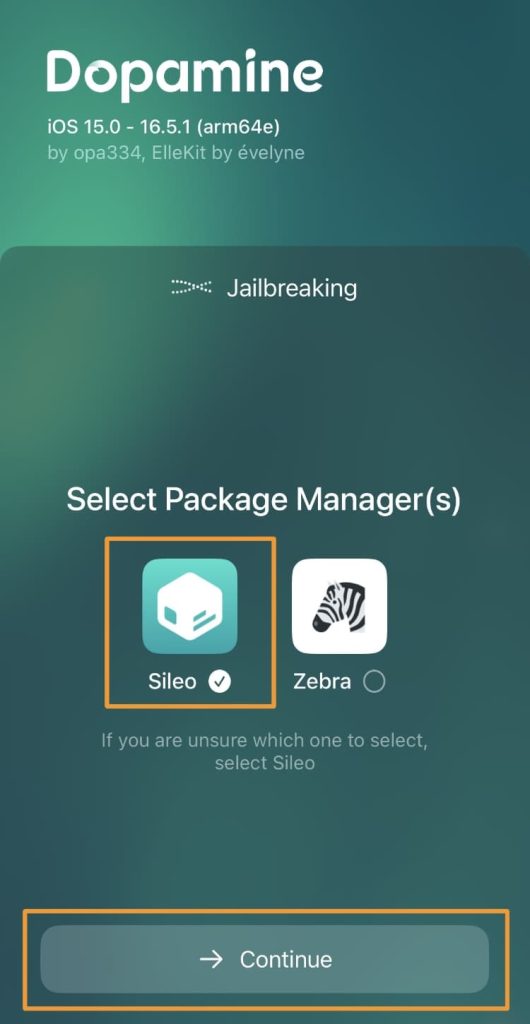
Select the Sileo or Zebra package manager and then tap Continue:

Step 21:

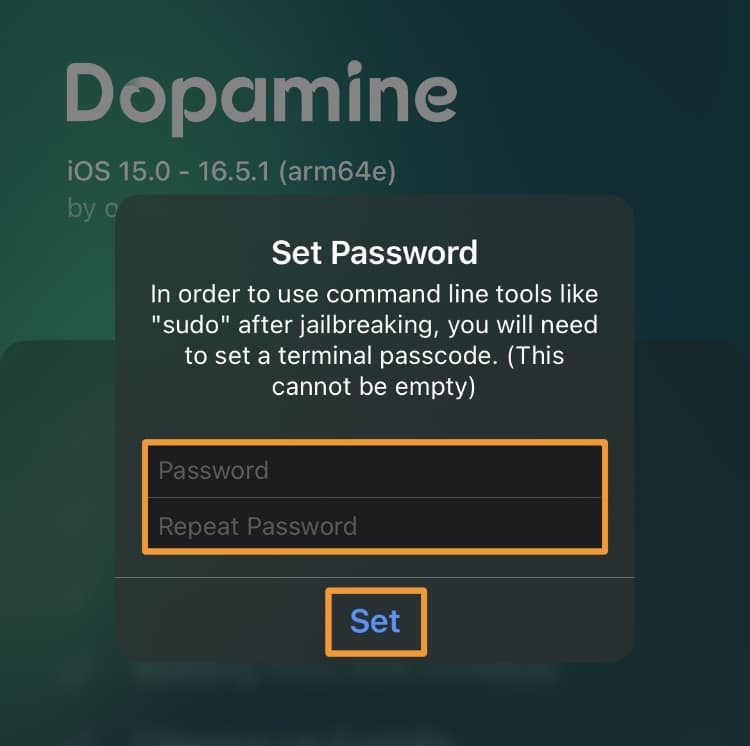
Enter a Terminal passcode. Make up one of your choosing (twice), and then tap Set:

Don’t forget your passcode!

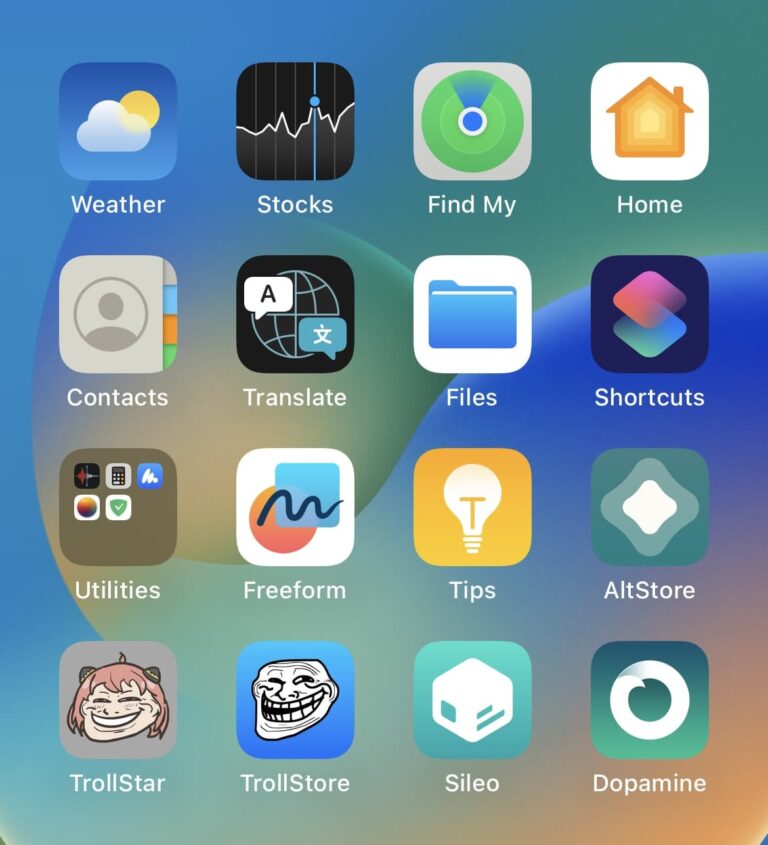
After the process completes, your selected package manager app will appear on your Home Screen:

Conclusion

In summary, this is all you need to do to install the Dopamine v2 jailbreak on a device running iOS or iPadOS 15.0-16.6.1*. The asterisk in 16.6.1* signifies that Dopamine v2 supports an arm64 version up to 16.6.1. A12-A14 arm64e devices are supported up to 16.5.1. A15-A16 arm64e devices are supported up to 16.5.
How to Jailbreak iOS 15.0-16.x on iPhone or iPad Using Palera1n-c

The palera1n-c jailbreak is semi-tethered, meaning you can reboot into a non-jailbroken state, but you won’t be able to jailbreak again until you can connect to your computer. This type of jailbreak is different from the semi-untethered jailbreak. A semi-untethered jailbreak can be re-jailbreak without requiring a computer after a reboot if your jailbreak app is still signed.

Installing palera1n-c requires the use of a terminal, as this jailbreak does not yet have a graphical user interface (GUI). The terminal is only available for Linux and macOS, so this jailbreak is not available for Windows users. If you have a Windows computer, we recommend using palen1x instead.

Compatible Devices with iOS 15.0-16.x

for iOS 15.0 – 15.7.1

  • A9 – iPhone 6S, iPhone 6S Plus, iPhone SE,iPad (2017) 5th Generation.
  • A9X – iPad Pro (12.9 in.) 1st generation, iPad Pro (9.7 in.).
  • A10 – iPhone 7 and iPhone 7 Plus, iPad (2018, 6th generation),iPad (2019, 7th generation) (iOS 14 not supported).
  • A10X – iPad Pro 10.5” (2017),iPad Pro 12.9” 2nd Gen (2017).
  • A11 – iPhone 8, iPhone 8 Plus, and iPhone X.

for iOS 16.0 – 16.4

  • A11 – iPhone 8, iPhone 8 Plus, and iPhone X.

Steps to Jailbreak iOS 16 with Palera1n-c

Follow these steps to install palera1n-c jailbreak on your macOS computer:

Step 1:

Connect your device to your Mac, and then trust your Mac and iPhone/iPad.

NOTE:

If you have a Mac with a USB-C port, we recommend using a USB-A to Lightning cable and an adapter. USB-C to Lightning cables can cause issues.

Step 2:

Download the latest version of palera1n from the palera1n website.

NOTE:

If you are using a Mac, you will need to download the correct file for your Mac, such as the ARM version for Macs with Apple M chips or the x86 version for Macs with Intel (a generic option is also available).

Step 3:

Enter the following command on the Mac:

cd Downloads

NOTE:

The word Downloads in the command above can be replaced with whatever folder name you used to download palera1n-c.

Step 4:

Enter the following command in Terminal and enter your administrator password, then you may see the output: mkdir: /usr/local/bin: File exists

sudo mkdir /usr/local/bin

Step 5:

Enter the following command:

sudo mv ./palera1n-macos-universal /usr/local/bin/palera1n

NOTE:

You can replace universal in the command above with whichever version you downloaded from GitHub, whether it is arm64, x86_64, or universal.

Step 6:

When prompted, enter your Mac’s administrator password.

Step 7:

Enter the following command in Terminal:

sudo xattr -c /usr/local/bin/palera1n

Step 8:

Enter the following command in Terminal:

sudo chmod +x /usr/local/bin/palera1n

Step 9:

Set your iPhone or iPad to DFU mode.

Step 10:

Enter the command that best suits your device:

  • For a device with 16GB of storage and only 2GB or 3GB available, run: palera1n -B -f
  • Using iOS 15 and between 2GB and 15GB of storage, run: palera1n -B -f
  • If your device runs iOS 16 or has more than 16GB of storage available, run: palera1n -c -f

NOTE:

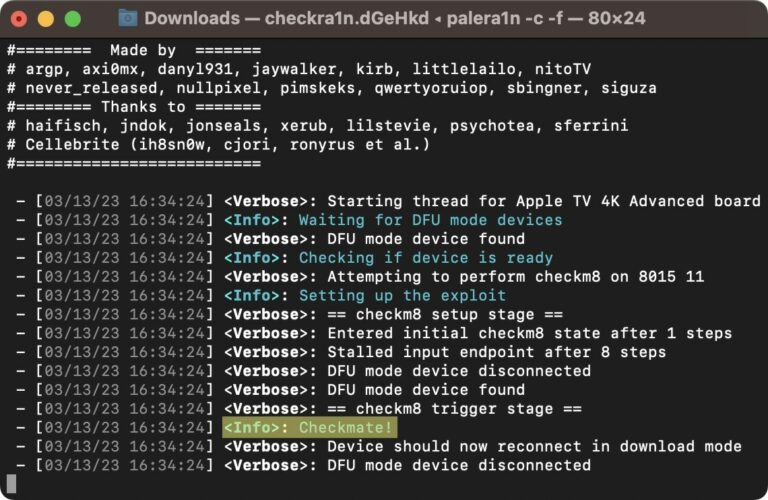
A Mac with an M chip will require you to unplug and replug it to restart the jailbreak process, as shown in the figure below. Macs equipped with Intel can ignore it.

Step 11:

The device will fully reboot when it is finished. Enter the following command in Terminal:

palera1n -f

Step 12:

Once your device is in Recovery mode, put it back into DFU mode.

NOTE:

Once DFU mode is detected, the palra1n-c jailbreak should resume automatically. If you have an M chip-equipped Mac, when you see the word Checkmate again, you must unplug and re-plug the device once the Apple logo appears.

Step 13:

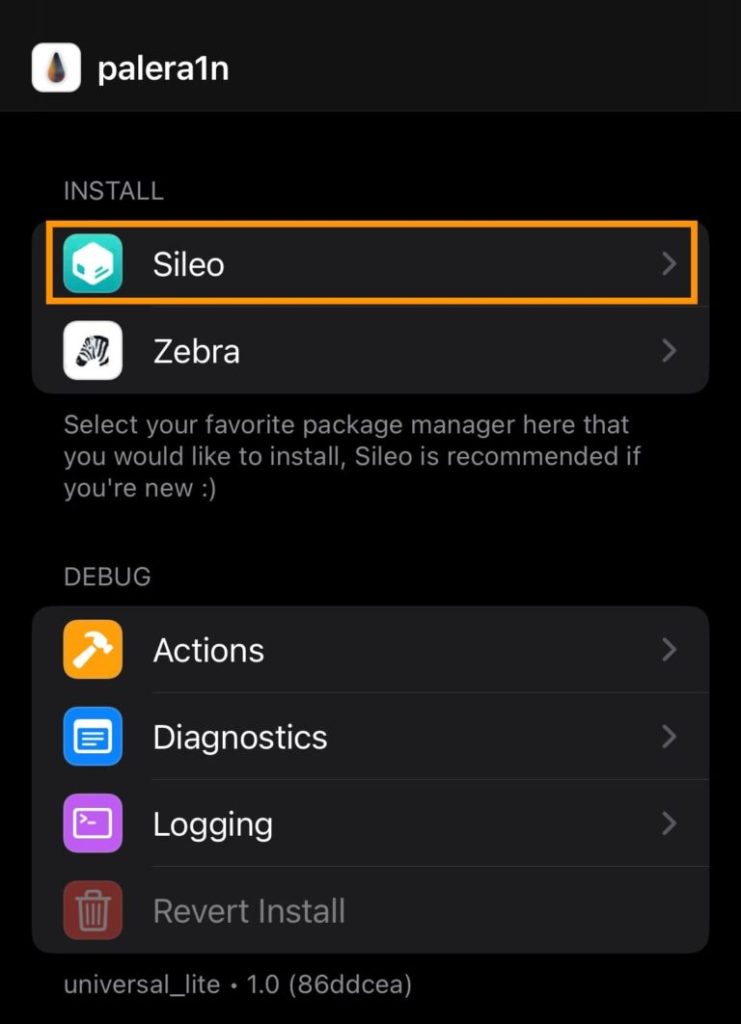
Launch the palera1n app on your Home Screen, and tap the Sileo button to install the Sileo package manager:

NOTE:

Once DFU mode is detected, the palra1n-c jailbreak should resume automatically. If you have an M chip-equipped Mac, when you see the word Checkmate again, you must unplug and re-plug the device once the Apple logo appears.

Step 14:

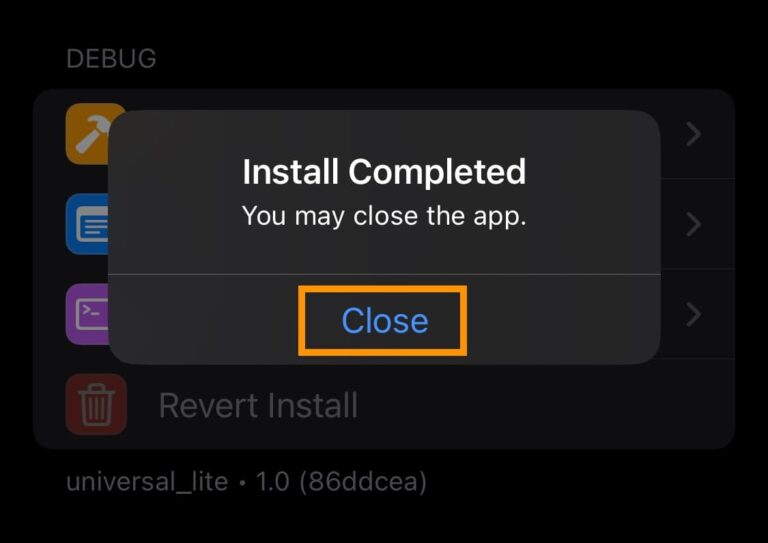
Enter a Terminal password when prompted. You can choose whatever password you want. After that, click Close to finish the installation.

Conclusion

After installing palera1n-c, we discovered that it is easier to use and requires less setup than palera1n. For example, you don’t need to install Python, and you don’t need Homebrew. In general, palera1n-c is a very convenient and easy-to-use jailbreak tool.

How to Jailbreak iOS 15.0-15.4.1 on iPhone or iPad Using Dopamine

Recently, developer Lars Fröder (@opa334) formally announced the release of Dopamine. This is a new iPhone and iPad jailbreak tool for arm64e devices running iOS and iPadOS 15.0-15.4.1.

This article will provide a step-by-step tutorial on how to install and use Dopamine.

The Introduction of Dopamine

The Dopamine jailbreak is based on Linus Henze’s Fugu15 jailbreak, which supports iOS and iPadOS 15.0-15.4.1, but only on arm64e devices. These devices are those with the A12 chip or newer, including the iPhone XS and newer. Dopamine cannot be used to jailbreak old devices.

Dopamine can be permanently signed on your device with TrollStore, so you don’t have to sign it every seven days. While you’ll need to re-jailbreak after every reboot, the convenience of permanently signed apps that don’t require post-installation interaction with your computer makes it a semi-untethered jailbreak tool.

Dopamine is a rootless jailbreak, so you can only use rootless compatibility packs. Additionally, Dopamine will install Sileo as the default package manager application, but you can also install an alternative package manager such as Saily or Zebra. It is important to note that Cydia is incompatible with iOS and iPadOS 15, as well as Rootless Dynamics.

Compatible Devices with iOS 15.0-15.4.1

  • A12 – iPhone XS & iPhone XS Max, iPhone XR.
  • A13 – iPhone 11, iPhone 11 Pro & 11 Pro Max, iPhone SE (2nd gen).
  • A14 – iPhone 12 & 12 Mini, iPhone 12 Pro & 12 Pro Max.
  • A15 – iPhone 13 & 13 Mini, iPhone 13 Pro & 13 Pro Max, iPhone SE (3rd gen).

Steps to Jailbreak iOS 15 with Dopamine

Step 1:

Install TrollStore. TrollStore installation tutorial:

How to install TrollStore with TrollHelperOTA

Step 2:

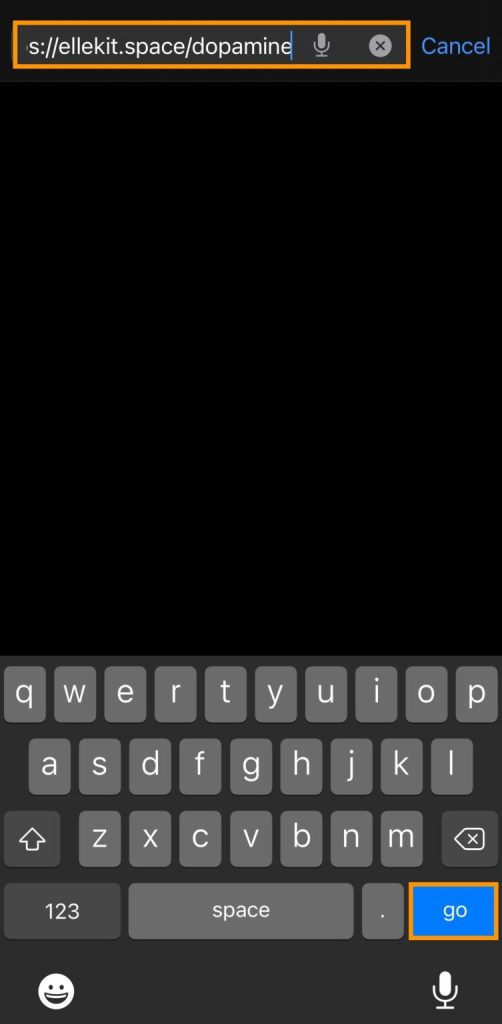
Click on Safari, then enter the URL: https://ellekit.space/dopamine/

Step 3:

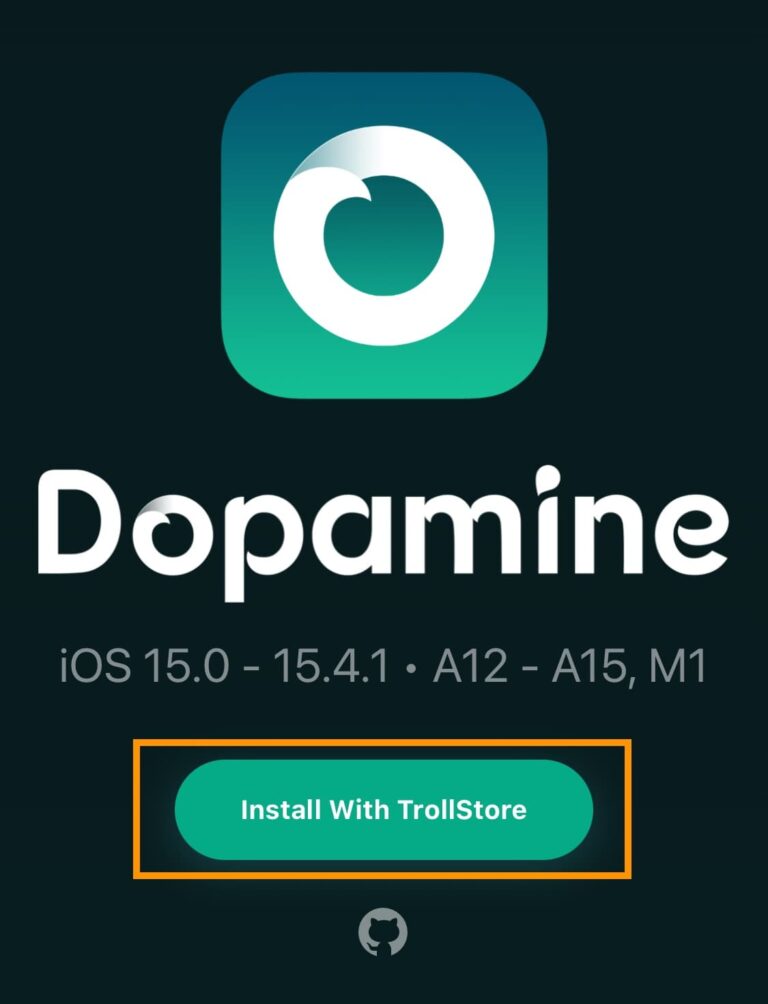
Click the Install with TrollStore button to download Dopamine

Step 4:

Click Dopamine in the download list, and then click the Share button


Step 5:

Click the TrollStore icon in the share list, and then click Install

NOTE:

The installation process will only take a few seconds, then you will see Dopamine in your TrollStore apps list.

Step 6:

After the installation is complete, click Dopamine, click the Jailbreak button, select Sileo package manager, and continue


Step 7:

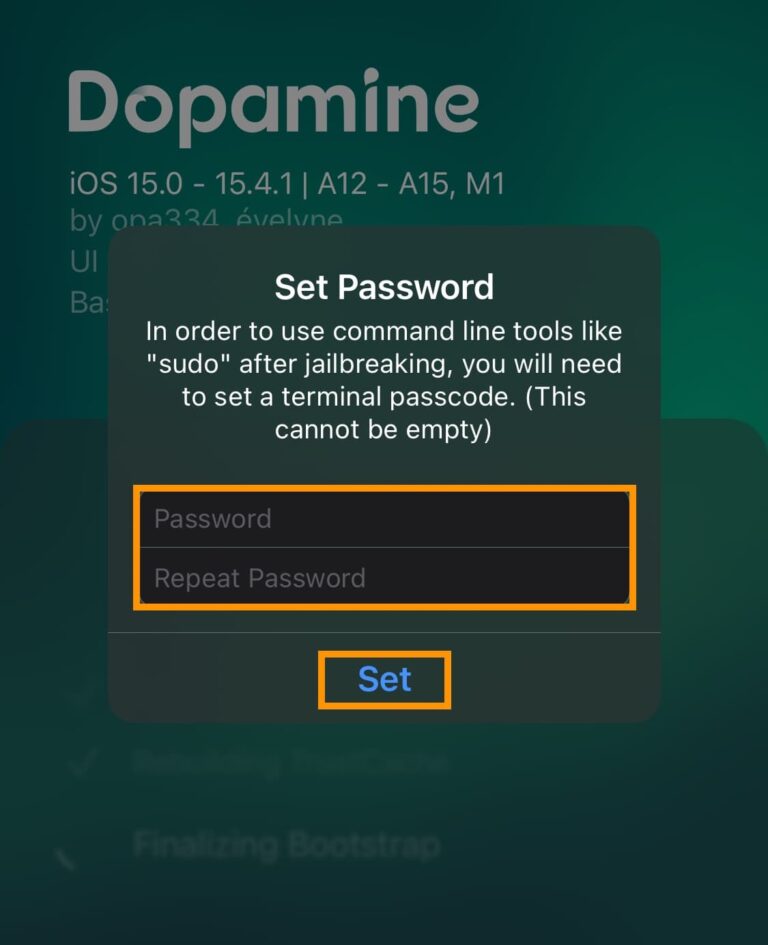
The system will prompt you to enter the terminal password and then click Set to complete the installation

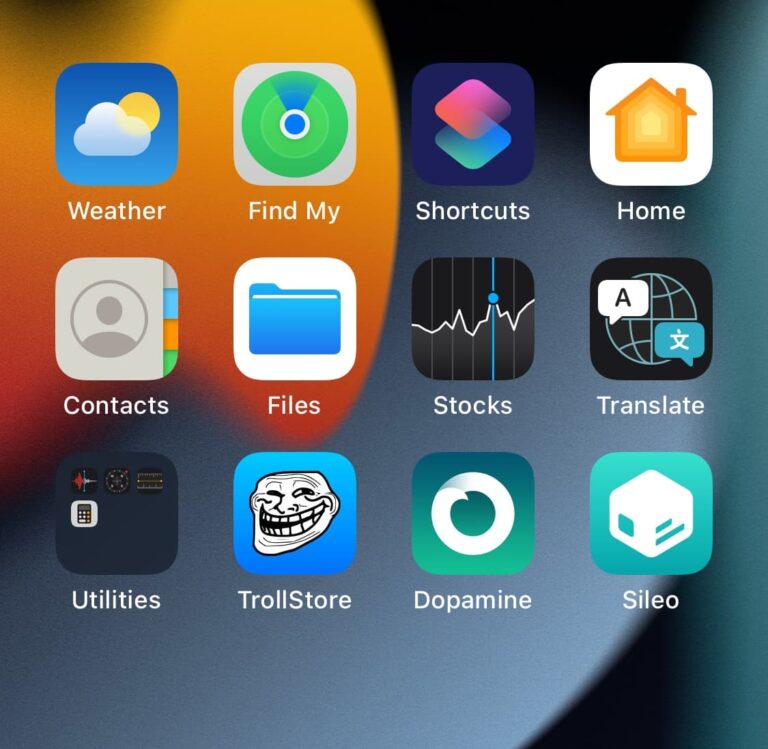
After installation, you will see the Sileo package manager app on the home screen.

How to Jailbreak iOS 12.0 ~ iOS 14.8.1 Using Checkra1n on iPhone or iPad

Here’s how to use the popular checkra1n jailbreak utility to jailbreak iOS 12.0 ~ iOS 14.8.1 on your Apple devices.

Jailbreak Compatible Devices:

  • iPhone X
  • iPhone 8, 8 Plus
  • iPhone 7, 7 Plus
  • iPhone 6s, 6s Plus, and SE
  • iPad 5th generation
  • iPad Air 2
  • iPad mini 4
  • iPad Pro 1st generation

Preparations Before Jailbreaking:

  • Delete any iOS 12.0 ~ iOS 14.8.1 OTA update file from Settings > Storage and reboot your device before attempting to jailbreak it.
  • A computer running macOS.
  • The latest version of iTunes installed if using a Mac running anything prior to macOS Catalina.
  • Make sure to create a backup of all important data on your device before proceeding with the jailbreaking steps.

Step 1:

Open a web browser and head over to checkra.in and download the latest version of the checkra1n app for your Mac.

Step 2:

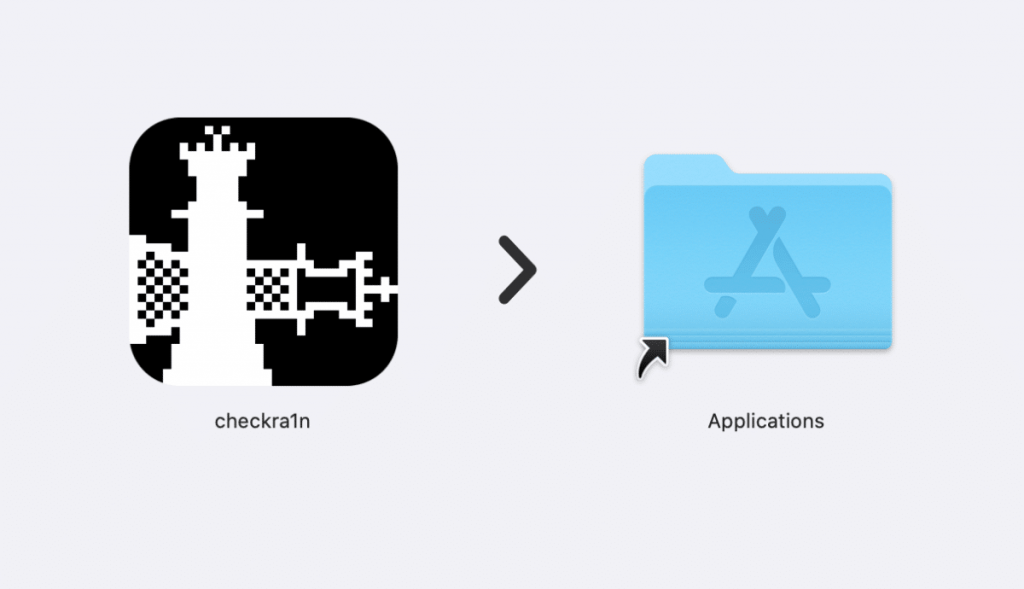
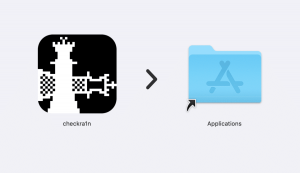
Open the downloaded DMG file and install the checka1n app to your /Applications folder.

checkra1n-applications

Step 3:

If the built-in macOS security settings won’t allow your Mac to open the app you will need to follow the steps below. If everything opens without any issues you can skip and move on to step 4:

  1. Head into the System Preferences app and select the Security & Privacy option.
  2. Select “Open Anyway” followed by “Open” and enter your administrator password when prompted.
  3. Try to run the checkra1n app again and you shouldn’t have any issues.

Step 4:

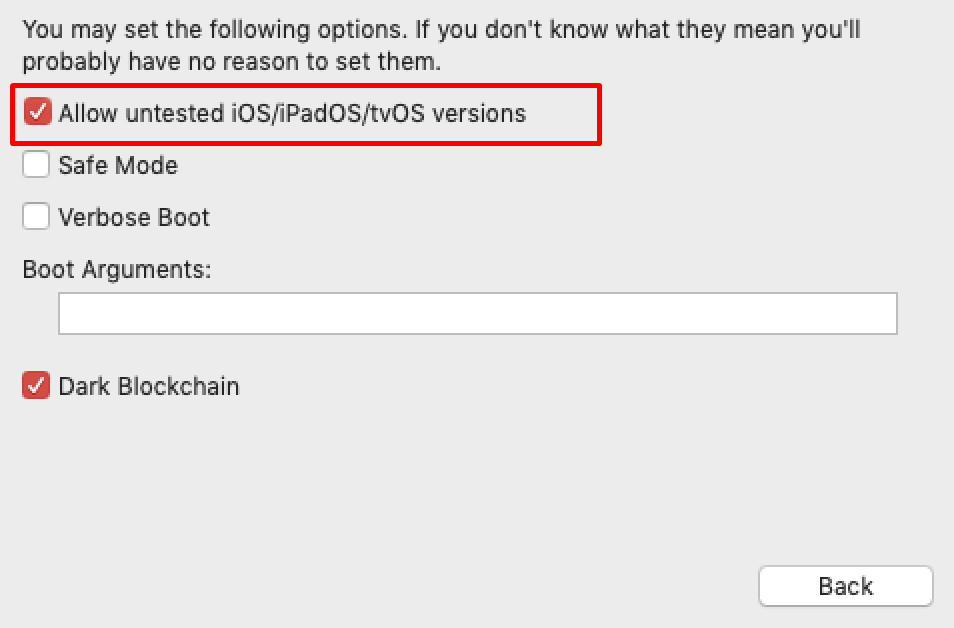
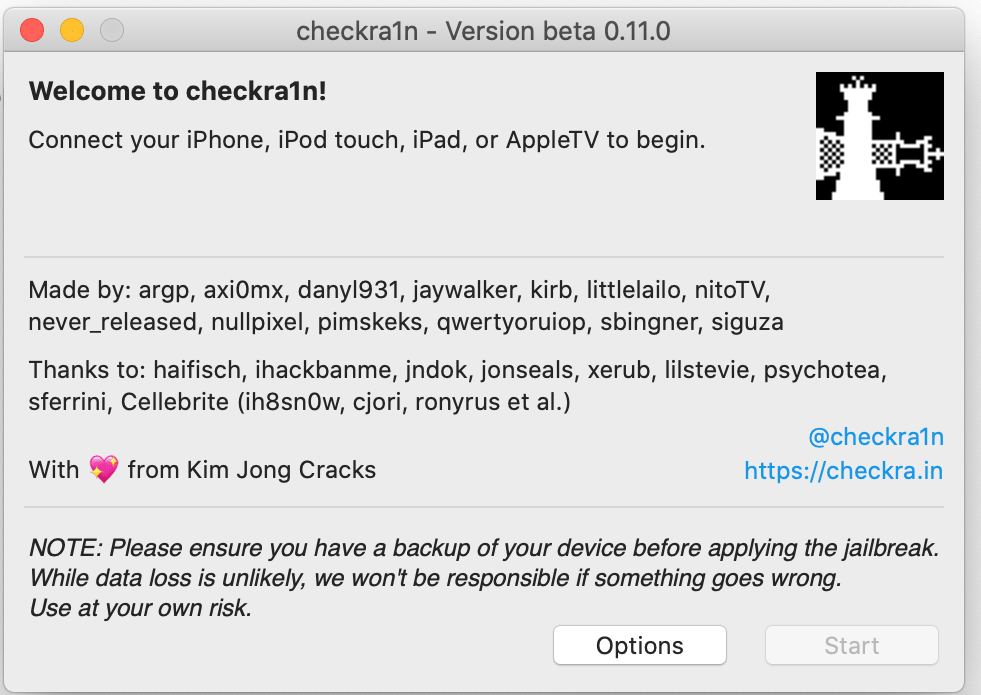
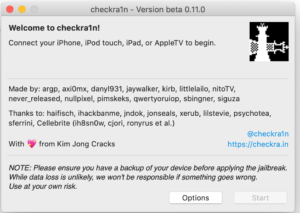
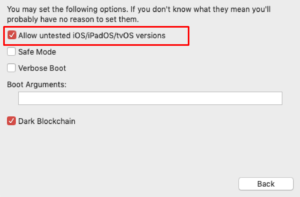
Launch the checkra1n app from your /Applications folder. Head into the checkra1n Options and check the Allow untested iOS/iPadOS/tvOS versions option. Now, select Back.

Allow untested iOS

Step 5:

Connect your device to the Mac using the necessary cable and click on the Start option. Select OK and then keep an eye on the checkra1n app.

Step 6:

Choose “Next” and then follow the instructions that the checkra1n app provides to you to get your device into DFU mode.

Step 7:

Once the DFU mode is activated and detected, Checkra1n will detect the device and start the jailbreak process. This will restart your device multiple times, so keep in mind that this is normal and a required part of this process.

How to Install SafeShutdown for Apple iPhone/iPad

SafeShutdown is a tweak designed to help avoid situations where the device battery runs out and you have to jailbreak again. It does this by initiating a “fake shutdown” when your battery reaches a set percentage. When the device is plugged in and charged to the set restart percentage, it undoes all changes and resprings, thus waking up the device.

Once enabled, the device will be completely unusable. If you want to override SafeShutdown and use the remaining battery, you can enable the emergency wake-up feature in the settings.

What happens when “fake shutdown” is enabled? The screen is turned off and disabled, low power mode is enabled, all buttons and touches are ignored, wake up when raised, notifications, alarms and timers are blocked, the flashlight is turned off, screen recording is stopped and saved, all apps are exited but not from apps deleted from the program switcher, all sounds and vibrations are disabled and so on.

Compatible Devices:

  • iPhone/iPad that compatibles with iOS 10 to 14

Install SafeShutdown:

  1. Open Cydia, tap on Search.
  2. Type: SafeShutdown, then tap on Install/Get.

Set Up SafeShutdown:

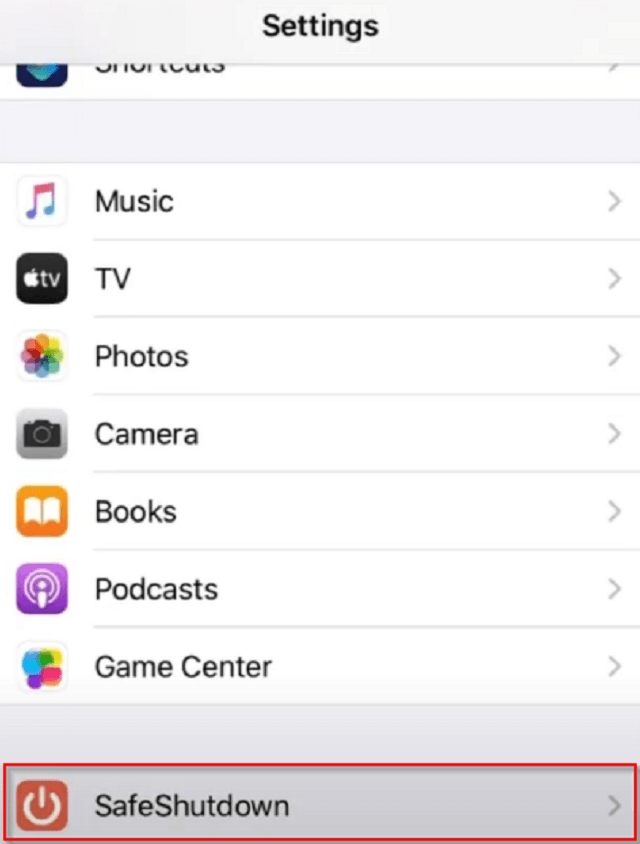
  1. Go to Settings > SafeShutdown.
  2. Settings-SafeShutdown

  3. Adjust the value of SHUTDOWN PERCENTAGE to 5.0.
  4. In this condition, your device saves the remaining 5% battery power. And the SafeShutdown tweak does not allow your device to disconnect.

    Adjust SHUTDOWN PERCENTAGE

  5. Enable the first slider under EMERGENCY WAKE UP.
  6. You can wake up your device by pressing the volume down button three times fast.

    EMERGENCY WAKE UP

Optional Settings

The developer added some features to warn you that the device will be shut down soon, which is great. For example, an alert feature will be very useful because you will be ready to activate SafeShutdown in advance.

In addition, you can turn on the power saving mode when SafeShutdown is enabled. You can also set the charge level for a notification or set a countdown timer for SafeShutdown.

Sentinel Alternative to SafeShutdown to Keep Your iDevice Jailbroken

Sentinel is designed to help you avoid re-jailbreaking your device when the battery runs out. When the battery power reaches the percentage set by the user, it will initiate a false shutdown. This makes Sentinel the best alternative to SafeShutdown. If you encounter problems when using SafeShutdown, then you can try this tweak.

Compatible Devices:

  • iPhone/iPad that compatibles with iOS 12.0 ~ iOS 14.7.1

Install Sentinel:

  1. Open Cydia.
  2. Tap on Sources, then click Edit.
  3. Tap on Add and type: https://apt.cydia.love/
  4. Tap on Add Source.
  5. Open Cydia, tap on Search.
  6. Type: Sentinel and install it.

Set Up Sentinel:

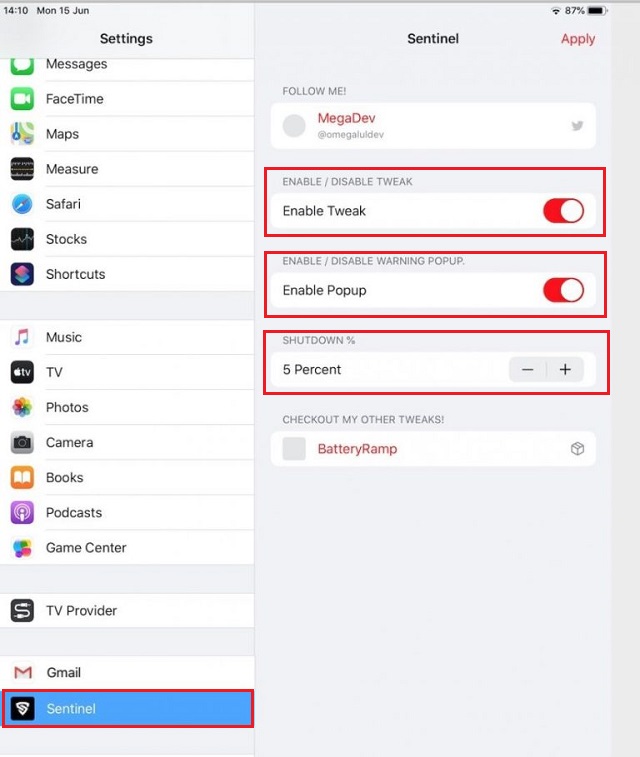
  1. Go to Settings > Sentinel.
  2. Enable the sliders under ENABLE/DISABLE TWEAK and ENABLE/DISABLE TWEAK WARNING POPUP.
  3. Adjust the value of SHUTDOWN% to 5% or higher.
  4. Set Up Sentinel

When your device reaches the set percentage, it will initiate a fake shutdown. This enables a built-in iOS utility called Hibernation, which can also be found in BatteryRamp. In addition, it also completely disables the springboard, which means that notifications, alarms, calls, will not come through. Your phone will hardly use any battery, which means you will have enough time to charge it and there is no need to re-jailbreak.

How to Jailbreak iOS 14.7 ~ iOS 14.7.1 Using Checkra1n on iPhone or iPad

Here’s how to use the very popular Checkra1n to jailbreak iOS 14.7 ~ iOS 14.7.1 on some older Apple devices.

Jailbreak Compatible Devices:

  • iPhone 6s, 6s Plus, and SE
  • iPad 5th generation
  • iPad Air 2
  • iPad mini 4
  • iPad Pro 1st generation

Preparations Before Jailbreaking:

  • Delete any iOS 14.7 ~ iOS 14.7.1 OTA update file from Settings > Storage and reboot your device before attempting to jailbreak it.
  • A computer running macOS.
  • The latest version of iTunes installed if using a Mac running anything prior to macOS Catalina.
  • Make sure to create a backup of all important data on your device before proceeding with the jailbreaking steps.

Step 1:

Open your browser and visit checkra.in and download the latest version of the Checkra1n app for your Mac computer.

checkra1n-applications

Step 2:

Take the downloaded DMG file and install the checka1n app to your /Applications folder.

Step 3:

If the built-in macOS security settings do not allow your Mac to open the app, you need to follow the steps below. If everything opens without any problems, you can skip and continue to step 4:

  • Head into the System Preferences app and select the Security & Privacy option.
  • Select “Open Anyway” followed by “Open” and enter your administrator password when prompted.
  • Try to run the Checkra1n app again and you shouldn’t have any issues.

Step 4:

Launch the Checkra1n app from your /Applications folder. Enter the Checkra1n option and check the “Allow untested iOS/iPadOS/tvOS version” option. Now, choose Back.
Run Checkra1n


Allow untested iOS

Step 5:

Connect your device to your Mac with the necessary cables, and click the “Start” option. Select “OK” and pay attention to the Checkra1n app.

Step 6:

Select “Next” and follow the instructions provided to you by the Checkra1n app to put your device into DFU mode.

Cydia

Step 7:

Once the DFU mode is activated and detected, Checkra1n will detect the device and start the jailbreak process. This will restart your iPhone multiple times, so keep in mind that this is normal and is a required part of this process.

How to Download and Enable Vnodebypass Jailbreak Bypass for iOS 12-14.X

Vnodebypass is a jailbreak bypass tweak developed for Apple devices. When you enable this tweak, it will disable all installed jailbreak tweaks and basically put your device in a quasi-non-jailbroken state. This allows you to freely run any app that may not run when your device is in a jailbroken state. In this article, we will show you how to download and enable vnodebypass jailbreak bypass on iOS 14 and below.

REQUIREMENTS

  • A jailbroken iPhone, iPad, or iPod touch
  • unc0ver v6.1.0 (or later) on iOS 14 or above
  • A jailbreak package manager
  • libkrw package

Step 1:

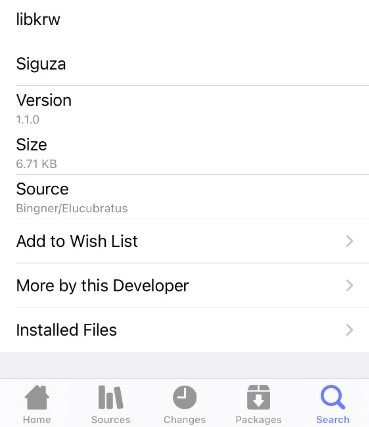
Fire up your preferred package manager, search for “libkrw” by Siguza and install it.

We will use the Zebra package manager in this walkthrough for demonstration purposes.

This package is available on the default Elucubratus repo (https://apt.bingner.com/). Make sure that you install v1.1.0 or above.

libkrw

Step 2:

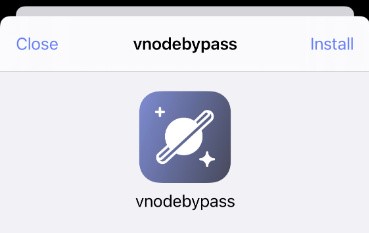
Open Safari and download vnodebypass v0.2.3 from the official GitHub repository of the project here.

vnodebypass

Step 3:

Now open the downloaded package in Zebra or Cydia and install it. Once you install the tweak, close your package manager.

Step 4:

The vnodebypass app should now appear on your home screen with the default white icon.

If for some reason the app doesn’t appear on your home screen, open the terminal and run the uicache command.

Step 5:

Launch the app and press Enable to enable the tweak.

Since it now comes with a front-end GUI, you no longer have to rely on PowerSelector or the terminal to enable it.

Step 6:

Run the app you want to bypass now that your device is in a non-jailbroken state. If the app fails to launch, try reinstalling it from the App Store.

Step 7:

Once you’re done, close the app and launch vnodebypass again. Press Disable to disable the tweak and go back to jailbreak mode again.

Note:

Vnodebypass jailbreak detection bypass cannot replace KernBypass-a kernel-level detection bypass. It may not be suitable for all apps that may be bypassed by kernel-level tweaks. Please note that it is an “experimental” tool and should be treated as such. We only recommend that you enable it only when you need to run certain apps. After closing vnodebypass, disable it immediately to avoid any potential problems.

How to Jailbreak iOS 14.6 Using Checkra1n on iPhone/iPad

Here’s how to use Checkra1n to jailbreak iOS 14.6 on a handful of older Apple devices.

Jailbreak Compatible Devices:

  • iPhone 6s, 6s Plus, and SE
  • iPad 5th generation
  • iPad Air 2
  • iPad mini 4
  • iPad Pro 1st generation

Preparations Before Jailbreaking:

  • Delete any iOS 14.6 OTA update file from Settings > Storage and reboot your device before attempting to jailbreak it.
  • A computer running macOS.
  • The latest version of iTunes installed if using a Mac running anything prior to macOS Catalina.
  • Make sure to create a backup of all important data on your device before proceeding with the jailbreaking steps.

Step 1:

Jump on over to checkra.in and download the latest version of the Checkra1n app for your Mac machine.

checkra1n-applications

Step 2:

Find the downloaded DMG file and install it on your /Applications folder on the Mac.

Step 3:

If Apple’s built-in security settings won’t allow your Mac to open the app you will need to follow the steps below. If everything opens without any issues you can then skip and move on to step 4:

  • Head into the System Preferences app and select the Security & Privacy option.
  • Select “Open Anyway” followed by “Open” and enter your administrator password when prompted.
  • Try to run the Checkra1n app again and you shouldn’t have any issues.

Run Checkra1n


Allow untested iOS

Step 4:

Launch the Checkra1n app that you have previously installed. Head into the Checkra1n Options and check the “Allow untested iOS/iPadOS/tvOS versions” option. Now, select Back.

Step 5:

Connect your device to the Mac using the provided Lightning cable and then click the Start button and select OK.

Step 6:

Choose Next and then follow the instructions that the Checkra1n app provides to you to get your device into DFU mode.

Step 7:

As soon as DFU Mode is activated and detected, Checkra1n will detect the device and start the jailbreak process. This will restart your iPhone/iPad several times, so please keep in mind that this is normal and is a required part of this process.

Cydia

How to Jailbreak iOS 14.5 ~ iOS 14.5.1 Using Checkra1n on iPhone or iPad

Here’s how to use Checkra1n to jailbreak iOS 14.5~ iOS 14.5.1 on a handful of older Apple devices.

Jailbreak Compatible Devices:

  • iPhone 6s, 6s Plus, and SE
  • iPad 5th generation
  • iPad Air 2
  • iPad mini 4
  • iPad Pro 1st generation

Preparations Before Jailbreaking:

  • Delete any iOS 14.5 ~ iOS 14.5.1 OTA update file from Settings > Storage and reboot your device before attempting to jailbreak it.
  • A computer running macOS.
  • The latest version of iTunes installed if using a Mac running anything prior to macOS Catalina.
  • Make sure to create a backup of all important data on your device before proceeding with the jailbreaking steps.

Processes of Checkra1n Jailbreak

Step 1:

Head over to checkra.in and download the latest version of the Checkra1n app for your Mac.

checkra1n-applications

Step 2:

Locate the DMG file that you just downloaded from the website and install it into your /Applications folder on the Mac.

Step 3:

If Apple’s security settings don’t allow your Mac to open the app, you will need to follow the steps below. If everything opens without any issues, you can then skip and move on to step 4:

  • Head into the System Preferences app and select the Security & Privacy option.
  • Select “Open Anyway” followed by “Open” and enter your administrator password when prompted.
  • Try to run the Checkra1n app again, and you shouldn’t have any issues.

Run Checkra1n


Allow untested iOS

Step 4:

Launch the Checkra1n app. Open the Checkra1n Options and check the “Allow untested iOS/iPadOS/tvOS versions” option. Now, select Back.

Step 5:

Connect your device via the provided Lightning cable and then click the Start button and select OK. Make sure that the Checkra1n app continues to run without any interruption.

Step 6:

Choose “Next” and then follow the instructions that the Checkra1n app provides to you. Following these steps will result in your device getting put into DFU Mode.

Step 7:

As soon as DFU Mode is activated and detected, Checkra1n will detect the device and start the jailbreak process. This will involve your iPhone or iPad rebooting a few times, so keep in mind that this is normal and is a required part of this process.

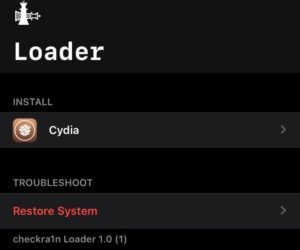
Cydia